


Making candy at home can feel intimidating, especially when recipes talk about exact temperatures and sugar stages. This is where a candy thermometer becomes your best friend. It removes guesswork, helps prevent burning, and ensures consistent results whether you are making caramel, fudge, or jam.
This beginner-friendly guide explains why candy thermometers matter, how to use one correctly, and how to avoid common mistakes so your sweets turn out right the first time.
Why Candy Thermometers Are Important
Sugar changes structure very quickly as it heats. A difference of just a few degrees can mean the gap between smooth caramel and a burnt mess. That is why candy thermometers are important for anyone serious about candy making.
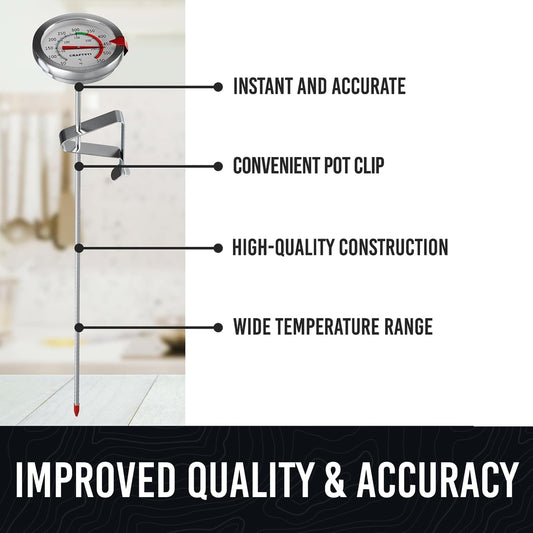
A candy thermometer measures higher temperatures than a regular kitchen thermometer. Most are designed to read from around 50 to 280°C (122 to 552°F), which covers all sugar cooking stages. This range is also useful for deep frying and jam making.
Using a thermometer gives you:
- Consistent results every time
- Better texture and flavor
- Less wasted ingredients
-
More confidence as a beginner
Types of Candy Thermometers You Will See
Before learning how to use one, it helps to understand the common types.
Classic cooking thermometer
This is the traditional glass or metal thermometer often clipped to the side of a pot. It is simple, reliable, and does not require batteries.
Mechanical thermometer
These usually have a metal probe with a dial at the top. They are durable and easy to read, making them popular for beginners.
Some candy thermometers also work as a deep-frying thermometer, which is useful if you want one tool for multiple tasks.
Getting Ready Before You Start
Before heating sugar, prepare your setup properly.
- For analog candy thermometers, occasional calibration helps ensure accurate cooking temperatures. Our quick calibration guide explains how: How to Calibrate a Dial Thermometer in Boiling Water | Step-by-Step Guide
- Choose a deep, heavy-bottomed saucepan. This helps heat evenly.
- Attach the thermometer to the side of the pot using the clip. This is part of learning how to use a clip-on thermometer correctly.
- Make sure the thermometer tip is submerged in the mixture but not touching the bottom of the pan. Touching the pan gives false readings.
- Read the temperature at eye level for accuracy.
Taking these steps early ensures you get accurate cooking temperatures from the start.
Step-by-Step: How to Use a Candy Thermometer
If you are new to candy making, follow this step-by-step candy temperature guide.
Step 1: Heat slowly
Turn the heat to medium or medium-high. Sugar heats fast, so rushing increases the risk of burning.
Step 2: Watch the thermometer, not the clock
Time varies depending on your stove and pan. Always rely on temperature, not minutes.
Step 3: Do not stir excessively
Stirring can cause sugar crystals to form on the sides of the pan. This affects texture.
Step 4: Reach the target temperature
Different candies require different temperatures. For example, caramel needs a higher temperature than fudge.
Step 5: Remove from heat immediately
Once the thermometer reaches the target, take the pan off the heat. Sugar keeps cooking even after you turn the stove off.
This is the core of how to use a candy thermometer for beginners, and mastering it builds confidence quickly.
Understanding Candy Making Temperatures
Candy recipes often mention sugar stages. These stages describe how sugar behaves at specific temperatures.
A sugar stages chart usually includes:
- Thread stage
- Softball stage
- Firm ball stage
-
Hard crack stage
For example, fudge requires the fudge soft ball stage, while brittle needs the hard crack stage. Jam makers also rely on precise jam-making temperatures to ensure proper setting.
Knowing these stages helps you understand why temperature control matters so much in candy making.

Common Candy Thermometer Mistakes to Avoid
Even with the right tool, mistakes can happen. Here are the most common ones beginners make.
Letting the thermometer touch the pan
This causes false high readings.
Not cleaning the thermometer properly
Sugar hardens fast. Clean it immediately after use with warm water.
Ignoring calibration
Test your thermometer in boiling water. It should read close to 100°C/212°F at sea level.
Heating too fast
High heat increases the chance of burning before you reach the correct temperature.
Avoiding these common candy thermometer mistakes will save time and ingredients.
Extra Pro Tips for Better Results
- Use a thermometer that clearly shows high ranges, like a 50–280°C (122 to 552°F) thermometer, for versatility.
- Keep a bowl of cold water nearby to stop cooking quickly if needed.
- Use the same thermometer for similar recipes to stay consistent.
-
Treat your thermometer as part of a full kitchen thermometer guide, not just a candy tool.
These small habits make a big difference in final texture and taste.
Final Thoughts
Learning to use a candy thermometer turns candy making from stressful to satisfying. It gives you control, consistency, and confidence in the kitchen. Whether you are melting sugar for caramel, checking oil for frying, or setting jam, a good thermometer helps you succeed.
With the steps above, you now know how to set it up, read it correctly, and avoid beginner mistakes. Once you trust the temperature instead of guessing, homemade candy becomes easier and far more enjoyable.

